Halloween Recipe Box
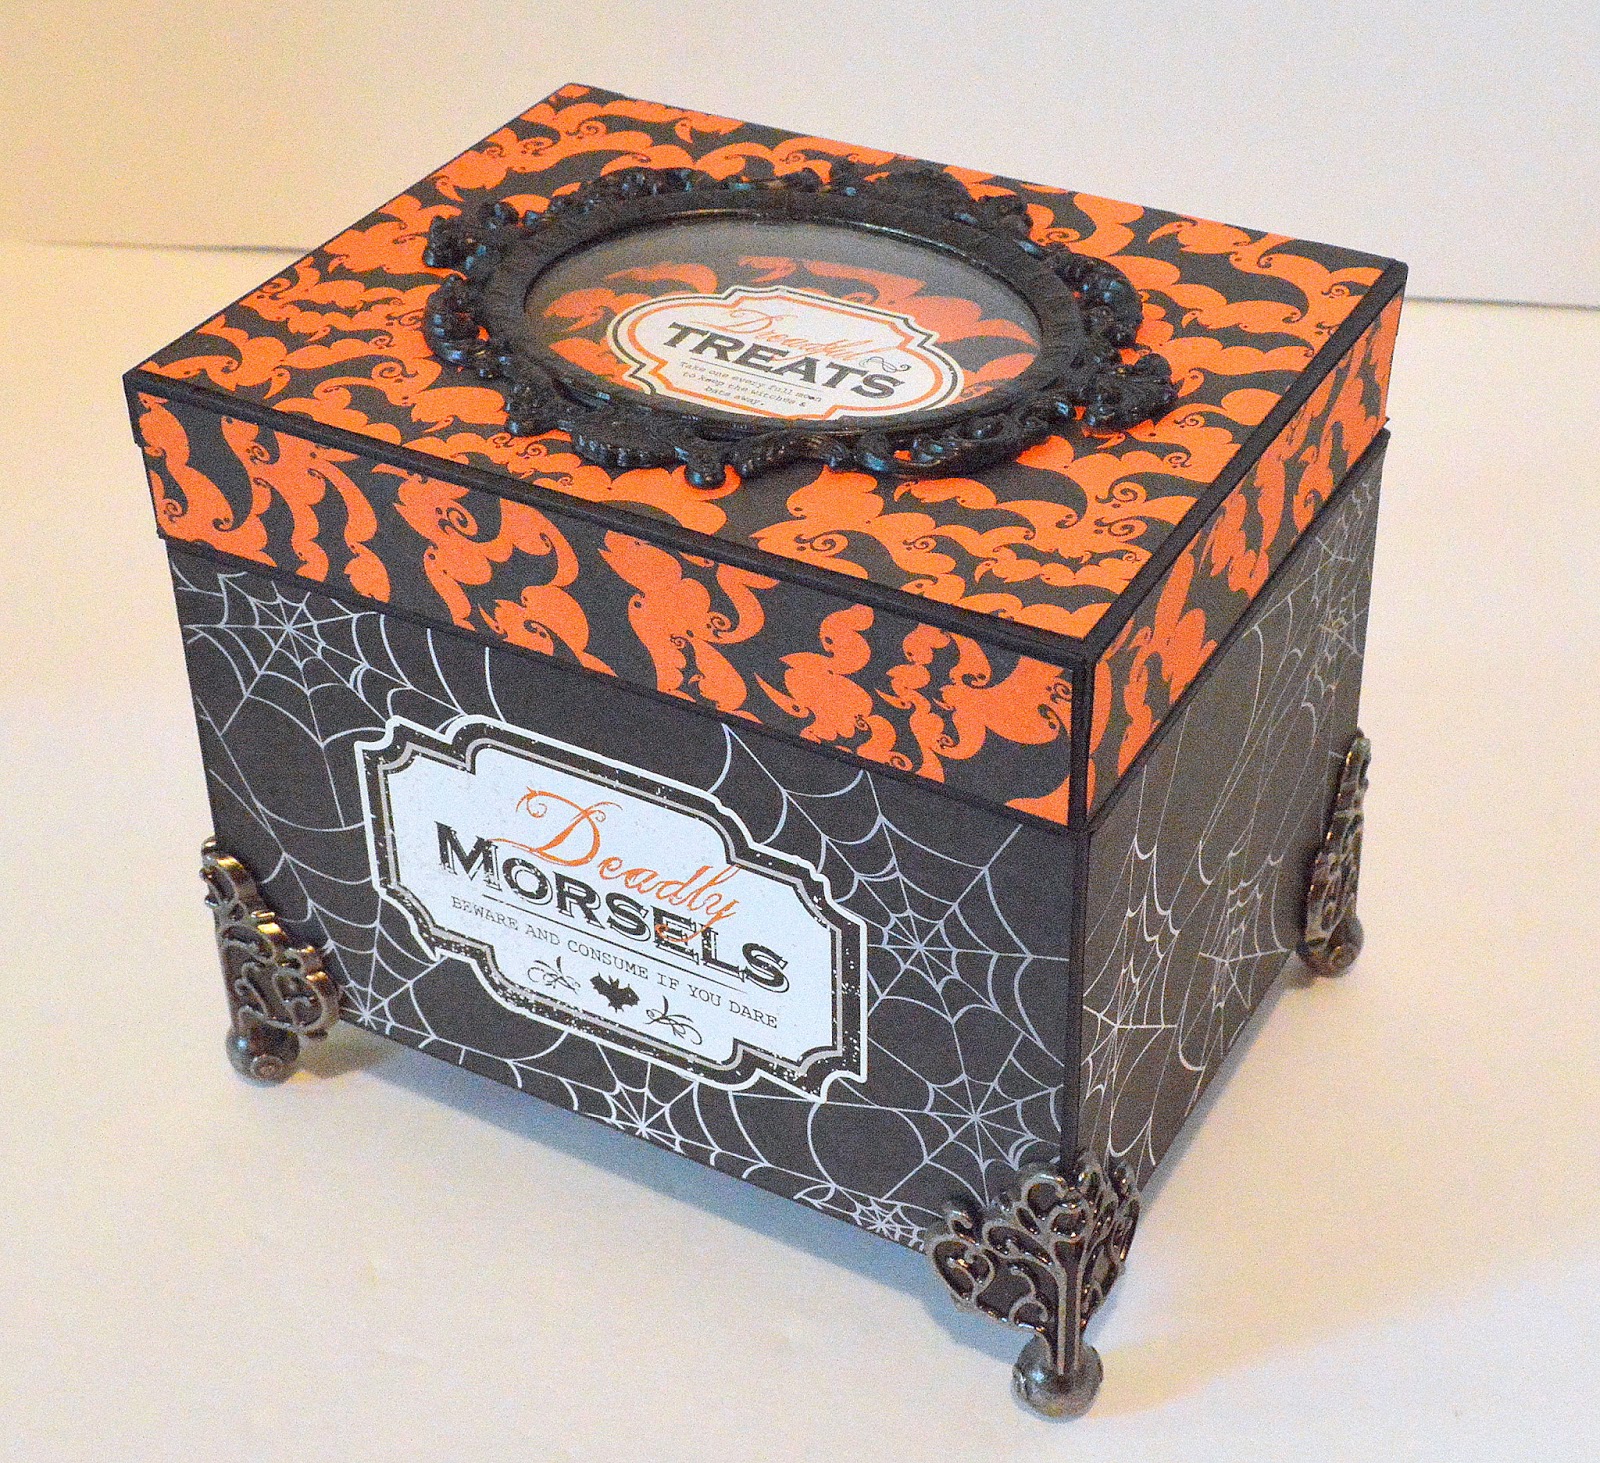

Why not start a tradition of filling this little beauty with all the recipes that you love to make at Halloween. How cool will it be when your kids, all grown up, pull out flour dusted recipe cards stained with sticky finger prints and relish the memories of warm Witch Fingers or Graveyard Brownies being pulled from the oven on All Hallows Eve.
Part One of this tutorial will tell you what supplies you will require and how to measure and cut the materials.
An important note before we start: the thickness of the chipboard is essential to the success of this project!!
The chipboard I've used is 40PT, available at Michaels in packs of 25 sheets. Each pattern piece has been cut TWICE to double the thickness, this will add strength to the box. Chipboard weights can be very confusing, to help you determine the chipboard required for this project I've made this visual:


Here is your list of supplies:
 |  |  |  |  |  |  |
 |
You will need approximately 5 sheets of chipboard, 6 sheets of black cardstock, one 12" x 12" sheet of both black and orange decorative paper. I have been generous with the amounts better to have a little extra than not enough.
Here are the planning sheets for measuring and cutting all the stock needed for this project. Each sheet is an individual downloadable PDF. There are four pages in total.
CLICK ON EACH PICTURE TO DOWNLOAD


Looks a little complicated but if you follow each page carefully you will have your pieces cut out fairly quickly...smile...really!
One quick tip; when cutting chipboard use a rotary blade or a craft knife avoid using scissors.
Scissors will crush the edges and make it difficult to achieve a good right angle when
the pieces are glued together.
Good Right Angles Are Essential To Making A Box With A Lid That Fits.
One quick tip; when cutting chipboard use a rotary blade or a craft knife avoid using scissors.
Scissors will crush the edges and make it difficult to achieve a good right angle when
the pieces are glued together.
Good Right Angles Are Essential To Making A Box With A Lid That Fits.
Note: if you downloaded the cutting guides prior to June 1, 2013 in Part One of the tutorial please revisit pages 2and 4 for a few measurement changes.
Hooray - you've made it through the cutting process! Now you'll have a number of little stacks of pieces laying around your work table. It's probably not a bad idea to label your stacks and perhaps your pieces in case of a mishap...like the cat...or the wind...or...you get the idea.
Let's get building!
1. Begin with the pieces cut from chipboard for the box body. If you used chipboard the thickness of a single dime you will have mirror images of each piece, glue each piece to its mate using double-sided tape.I prefer to use double-sided tape for this process as glue warps the chipboard making assembly difficult.
2. Follow the same procedure with the pieces for the box lid.
3.Using Weldbond or good quality white glue begin gluing the pieces together according to the illustration below, it is important to glue the pieces together in the correct order to ensure that the corners will line up.


Follow these steps for both the box body and box lid.


5. Apply decorative paper pieces to the exterior of the box body and box lid using double sided tape. For a polished look run a black marker around the outside edges of the decorative paper pieces before you glue them down, this will get rid of that ugly white edge. It's all in the details right!

6. Glue black cardstock liner piece for bottom of box interior into place.
7. Using a black marker color the outside edges of each of the chipboard interior wall foundation pieces.
Each chipboard interior wall piece will be covered entirely on one side with a 5 3/4" x 4 1/4" piece of black cardstock and partially on the other side with a 5 3/4" x 1 1/4" piece of black cardstock, which you cut out earlier. Cover each of the interior wall pieces in this manner.
DO A TEST FIT. Slide the interior wall pieces inside the box and hold them temporarily in place with a few strips of painters tape. Try to put the box lid on, if it catches on the edges of the interior wall pieces, trim the left and right interior wall pieces down by a tiny amount then try to fit the lid on again. Do this until the lid slides on and off smoothly. Remove the interior wall pieces and the painters tape. Proceed to step 8.
4. Apply black edging strips cut previously from black cardstock. There are TWO ways to score the strips:


When all the black edging strips have been applied your box and lid should look like this.
5. Apply decorative paper pieces to the exterior of the box body and box lid using double sided tape. For a polished look run a black marker around the outside edges of the decorative paper pieces before you glue them down, this will get rid of that ugly white edge. It's all in the details right!

6. Glue black cardstock liner piece for bottom of box interior into place.
7. Using a black marker color the outside edges of each of the chipboard interior wall foundation pieces.
Each chipboard interior wall piece will be covered entirely on one side with a 5 3/4" x 4 1/4" piece of black cardstock and partially on the other side with a 5 3/4" x 1 1/4" piece of black cardstock, which you cut out earlier. Cover each of the interior wall pieces in this manner.
DO A TEST FIT. Slide the interior wall pieces inside the box and hold them temporarily in place with a few strips of painters tape. Try to put the box lid on, if it catches on the edges of the interior wall pieces, trim the left and right interior wall pieces down by a tiny amount then try to fit the lid on again. Do this until the lid slides on and off smoothly. Remove the interior wall pieces and the painters tape. Proceed to step 8.
 | ||
| Showing front and back of chipboard interior wall piece covered with black cardstock |
8. Apply double sided tape to the chipboard surface of each interior wall piece and carefully slide it inside the box body forming the lining plus a protruding upper edge that will hold the lid in place.
Cut strips of black cardstock the depth of the interior box by 1" wide. Score each strip down the center and fold it into a "v" shape. Apply double sided tape to the outside edges of the strip and slide them into the corners of the box interior. This will hold the interior wall pieces into place at the corner and cover any chipboard that may be showing where the walls meet.
9. Use Weldbond to glue the Tim Holtz idea-ology box feet into place on each corner.
That's it for this post...phew...you're a trouper. Go put your feet up!
If you've made it this far you are in the home stretch. This post will deal with inserting the frame, applying the labels and printing the divider cards.
1. Disassemble the frame, if it's dirty give it a wash in soap and water, let it dry thoroughly. Using the black Krylon spray paint give the frame a few thin coats, enough to cover the metal finish. Allow to dry.

2. The quickest way I have found to trace the ring on the underside of the frame is to use a stamp pad and simply stamp an impression of the ring onto a piece of paper.


3. Add a 1/16" border around the outside of the oval pattern. Cut out the pattern.

4. Fold the oval pattern in half lengthwise and again width-wise creating two bisecting lines as pictured below in figure "A". For the box lid find the center by measuring the half way point for both the length and width use a light pencil line that can be erased easily and draw two bisecting lines as pictured below in figure "B". Lay the paper oval on the lid and line up the lines on both pieces.Trace around the oval shape with a pencil. Keep this oval pattern we'll need it in step 8.


5. Using a craft knife cut out the oval. You will be cutting through multiple layers and continuous pressure will be required. BE CAREFUL - YOUR BLOOD SPLATTER PATTERN IS NOT REQUIRED FOR THIS PROJECT! Try to make the cut as neat as possible, this piece will be used again. Erase any pencil lines that remain on the lid and on the oval cutout.

7. Apply the labels to the front of the box and the cut out oval. **A special note for the labels, I had originally usedEcho Parks Element Stickers from their Apothecary Emporium Collection
for this project. I encourage you to try to find this awesome sheet either sold separately or in a collection. Unfortunately, I have found it difficult to find the stickers through a reputable buyer in-store or online.


8. Retrieve the oval pattern you made in steps two and three, trim off a scant 1/8" margin around the outside. Lay this revised pattern onto the oval piece that you cut out from the lid (which should have a label on it now). Line it up as best you can, trace around the oval and trim off the outside edge of the cutout.

9. Fitting (no gluing yet). Clean the frame's glass if necessary then position it in the frame. Lay the newly trimmed oval cut out piece from the lid over the glass. Make sure the pattern on the cut out is running in the same direction as the pattern on the lid and that the label is straight or you may find when you turn the lid over that one of the patterns is upside down or the label is crooked. You may need to trim the oval cut out down by small increments until it fits properly. Mark the cut out on the top, bottom and sides with a small pencil mark this will help you to realign the piece in the next step. Remove the cut out and the glass.
10. Apply dots of Glossy Accents around the inside lip of the frame drop in the glass, press into place and allow to set. Apply small dots of Glossy Accents to the perimeter of the cutout on the label side. Using the pencil marks you made on the cut out in step 9 position the cut out into the frame opening. Apply pressure to the cut out until it sets. Allow to dry completely.
11. Apply Weldbond to the back of the frame and position it in the opening in the lid. Allow to dry. For added support run a bead of Glossy Accents around the frame on the underside of the lid. Let it dry completely. Put lid on box...cool eh!

12. Print out the recipe dividers. I've made ten dividers for this recipe box covering everything from "Abhorrent Appetizers" to "Possessed Pumpkins"! You can print them out on cardstock or print them out on paper and glue them to the same chipboard used for the box construction, cover the back side with black cardstock. Click on each of the pictures below to download the recipe dividers.
 |
| Abhorrent Appetizers and Bewitching Beverages |
 |
| Conjured Condiments and Scary Salads & Sides |
 |
| Beastly Breads and Mystical Meats |
 |
| Creepy Cakes & Pies and Cursed Cookies |
 |
| Horrid Halloween Candy and Possessed Pumpkins |
I was browsing for Halloween Recipes but this post was equally interesting too! Nice for Halloween party preparation :) Thanks for sharing!
ReplyDelete