This recipe comes from www.mangiodasola.com . WARNING! WARNING!WARNING! DO NOT MAKE WITHOUT ADULT SUPERVISION!! MAY LEAD TO YOU EATING THE WHOLE THING BY YOURSELF!......So Enjoy sparringly!!

Sunday, February 7th, was....*gulp*...my birthday. Whew! There. I said it. I know my mom's proud and shocked. It has taken me years to admit my birthday publicly to friends, students, and strangers. Usually I don't tell anyone and don't even celebrate the day of my birth. I also turn off my cellphone to avoid well-intentioned phone calls from relatives and my ex-girlfriend. I really don't like commemorating the 7th of February, but interestingly, food blogging is the catalyst behind my decision to slowly change my perspective.

For weeks, I have been planning out what type of cake I wanted to make for my birthday. Like I said, I don't usually do anything for my birthday, but now that I have just started baking, I decided to make something special for it. (My friend guessed right that I made this cake for the blog more so than for my birthday haha)
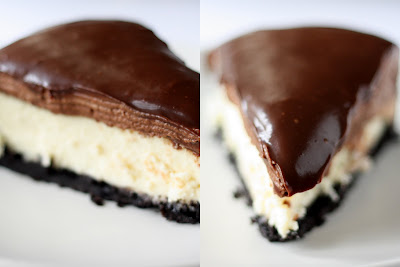
I wrote down notes for my quintessential cake. I wanted it to be special. I wanted it to have layers. I wanted it to be beautiful - no, I wanted it to be stunning. I wanted it to have my go-to cheesecake in it and chocolate. From there, I put together what I'll call a Chocolate Mousse Cheesecake made up of an Oreo crust, regular cheesecake filling (to contrast with the welcomed onslaught of chocolate), espresso mousse au chocolat, and espresso chocolate ganache on top.

Since I'm not very creative, I didn't add any frills such as whipped cream decorations or pieces of fruit, and ultimately, I was happy with that decision. It was already more than enough. It was decadent. Smooth. Silky with a slight crunch from the crust. Delectable. Rich. PERFECTION.
I really, really, really don't mean to brag, but every single layer was perfect. Every layer complimented each other brilliantly. I was shocked. I couldn't believe I had made this cake...every single layer. I was proud of myself for planning it out and allowing my plans to come to fruition successfully.

I knew that I couldn't keep this amazing creation in my house for long, so via text messaging and quick visits, I shared slices with my nearby colleagues/friends/neighbors (yes, they wear all three of those hats; I live in graduate housing, remember? :D). They all loved this cake. One person said I should sell it. Another person ate two slices in under 5 minutes. Another couldn't focus on our non-gastronomic conversation even after finishing off the cake and scraping the plate b/c she would interject repeatedly about how delicious the cake was haha.
 My mom's birthday card in the background; she just couldn't resist...
For the cheesecake:
1 pound (two 8-ounce boxes) cream cheese, at room temperature
2/3 cup granulated sugar
1/4 teaspoon salt (I always use kosher salt)
1 teaspoon pure vanilla extract
2 large eggs, at room temperature
2/3 cup heavy cream (or sour cream or combination)
Put a kettle or pot of water on to boil. Preheat the oven to 325 degrees Fahrenheit.
Working in a stand mixer (or large bowl with hand mixer), preferably fitted with a paddle attachment, beat the cream cheese at medium speed until it is soft for about 4 minutes. With the mixer running, add the sugar and salt, and continue to beat another 4 minutes or so, until the cream cheese is light. Beat in the vanilla extract. Add the eggs one by one, beating for a full minute after each addition to yield a well-aerated batter. Reduce the mixer speed to low, and stir in the heavy cream or sour cream.
Put the foil-wrapped springform pan in the roaster pan, and pour in a few cups of the hot water in the pan around the springform pan (I do half before putting the cheesecake mixture, to reduce my chances of getting water in the cheesecake and to get everything ready.)
Give the batter a few stirs with a rubber spatula, just to make sure that nothing has been left unmixed at the bottom of the bowl, and scrape the batter into the springform pan. The batter should fill only half of the pan. Put the roasting pan in the oven and pour the rest of the boiling water into the roaster to come halfway up the sides of the springform pan.
Bake the cheesecake for 1 hour and 15-30 minutes, at which point the top will be browned (and perhaps cracked) and may have risen just a little above the rim of the pan. Turn off the oven's heat, and prop the oven door open with a wooden spoon. Allow the cheesecake to luxuriate in its water bath for another hour.
After 1 hour, carefully pull the setup out of the oven, lift the springform pan out of the roaster—be careful, there may be some hot water in the aluminum foil—remove the foil. Let the cheesecake come to room temperature on a cooling rack.
When the cake is cool, cover the top lightly and chill the cake for at least 4 hours or overnight. Make the mousse once the cheesecake has cooled.
Layer 3: Mousse au chocolat/French Chocolate Mousseadapted from Tyler Florence on Food Network
6 ounces semisweet baking chocolate, chopped (I used Callebaut; use good chocolate)
3 tablespoons unsalted butter, softened
2 tsp espresso powder (added to intensify chocolate flavor, optional)
3 eggs, separated
1/2 teaspoon cream of tartar

Sunday, February 7th, was....*gulp*...my birthday. Whew! There. I said it. I know my mom's proud and shocked. It has taken me years to admit my birthday publicly to friends, students, and strangers. Usually I don't tell anyone and don't even celebrate the day of my birth. I also turn off my cellphone to avoid well-intentioned phone calls from relatives and my ex-girlfriend. I really don't like commemorating the 7th of February, but interestingly, food blogging is the catalyst behind my decision to slowly change my perspective.

For weeks, I have been planning out what type of cake I wanted to make for my birthday. Like I said, I don't usually do anything for my birthday, but now that I have just started baking, I decided to make something special for it. (My friend guessed right that I made this cake for the blog more so than for my birthday haha)
I wrote down notes for my quintessential cake. I wanted it to be special. I wanted it to have layers. I wanted it to be beautiful - no, I wanted it to be stunning. I wanted it to have my go-to cheesecake in it and chocolate. From there, I put together what I'll call a Chocolate Mousse Cheesecake made up of an Oreo crust, regular cheesecake filling (to contrast with the welcomed onslaught of chocolate), espresso mousse au chocolat, and espresso chocolate ganache on top.

Since I'm not very creative, I didn't add any frills such as whipped cream decorations or pieces of fruit, and ultimately, I was happy with that decision. It was already more than enough. It was decadent. Smooth. Silky with a slight crunch from the crust. Delectable. Rich. PERFECTION.

I really, really, really don't mean to brag, but every single layer was perfect. Every layer complimented each other brilliantly. I was shocked. I couldn't believe I had made this cake...every single layer. I was proud of myself for planning it out and allowing my plans to come to fruition successfully.

I knew that I couldn't keep this amazing creation in my house for long, so via text messaging and quick visits, I shared slices with my nearby colleagues/friends/neighbors (yes, they wear all three of those hats; I live in graduate housing, remember? :D). They all loved this cake. One person said I should sell it. Another person ate two slices in under 5 minutes. Another couldn't focus on our non-gastronomic conversation even after finishing off the cake and scraping the plate b/c she would interject repeatedly about how delicious the cake was haha.
 My mom's birthday card in the background; she just couldn't resist...
Chocolate Mousse Cheesecake
A creation compiled by me along with two giants in the cooking world.
NOTE: to make things easier, make the cheesecake and crust on one day and the mousse and ganache on the next day. Cheesecake lasts longer than mousse. Keep this cake refrigerated and will last up to 2-3 days but is best eaten the day it's made.
NOTE: to make things easier, make the cheesecake and crust on one day and the mousse and ganache on the next day. Cheesecake lasts longer than mousse. Keep this cake refrigerated and will last up to 2-3 days but is best eaten the day it's made.
Layer 1: Oreo Cookie Crust
30-32 Oreo cookies (or chocolate sandwich cookies) for a high crust
4 Tbsp unsalted butter (1/2 stick), melted
1-2 tsp espresso powder (optional)
Crush cookies in a food processor or in a ziploc bag with a rolling pin or mallet. In a bowl or food processor, pour melted butter on top of the crushed cookies and add the espresso powder (optional), and mix or pulse well. Place the oreo mixture at the bottom of a springform pan. Smooth out the mixture with the bottom of a measuring cup or glass. Wrap the bottom of the pan in a double layer of aluminum foil. Place the crust in the freezer while you make the cheesecake.
Layer 2: Tall & Creamy CheesecakeHALVED & adapted from Dorie Greenspan's Baking: From My Home to Yours
1 pound (two 8-ounce boxes) cream cheese, at room temperature
2/3 cup granulated sugar
1/4 teaspoon salt (I always use kosher salt)
1 teaspoon pure vanilla extract
2 large eggs, at room temperature
2/3 cup heavy cream (or sour cream or combination)
Put a kettle or pot of water on to boil. Preheat the oven to 325 degrees Fahrenheit.
Working in a stand mixer (or large bowl with hand mixer), preferably fitted with a paddle attachment, beat the cream cheese at medium speed until it is soft for about 4 minutes. With the mixer running, add the sugar and salt, and continue to beat another 4 minutes or so, until the cream cheese is light. Beat in the vanilla extract. Add the eggs one by one, beating for a full minute after each addition to yield a well-aerated batter. Reduce the mixer speed to low, and stir in the heavy cream or sour cream.
Put the foil-wrapped springform pan in the roaster pan, and pour in a few cups of the hot water in the pan around the springform pan (I do half before putting the cheesecake mixture, to reduce my chances of getting water in the cheesecake and to get everything ready.)
Give the batter a few stirs with a rubber spatula, just to make sure that nothing has been left unmixed at the bottom of the bowl, and scrape the batter into the springform pan. The batter should fill only half of the pan. Put the roasting pan in the oven and pour the rest of the boiling water into the roaster to come halfway up the sides of the springform pan.
Bake the cheesecake for 1 hour and 15-30 minutes, at which point the top will be browned (and perhaps cracked) and may have risen just a little above the rim of the pan. Turn off the oven's heat, and prop the oven door open with a wooden spoon. Allow the cheesecake to luxuriate in its water bath for another hour.
After 1 hour, carefully pull the setup out of the oven, lift the springform pan out of the roaster—be careful, there may be some hot water in the aluminum foil—remove the foil. Let the cheesecake come to room temperature on a cooling rack.
When the cake is cool, cover the top lightly and chill the cake for at least 4 hours or overnight. Make the mousse once the cheesecake has cooled.

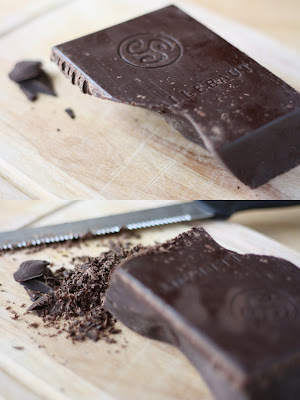
Quality chocolate courtesy of Callebaut Chocolate. YUM.
6 ounces semisweet baking chocolate, chopped (I used Callebaut; use good chocolate)
3 tablespoons unsalted butter, softened
2 tsp espresso powder (added to intensify chocolate flavor, optional)
3 eggs, separated
1/2 teaspoon cream of tartar
Comments
Post a Comment