This diy was found at www.modpodgerocksblog.com . Get ready for some cool fall projects coming your way.
Hello Podgers! It's time for Halloween - and in a big way. I'm ashamed that it's almost the end of September and I have barely started Halloween crafting. I gotta get on the stick this weekend. Black glitter isn't going to sprinkle itself!
Luckily Man Podger David has begun Halloween crafting, so he is totally saving my butt this week. These Mod Podged blocks will make a great addition to your home decor, especially to those decorative mantles that so many of you do. Here is the complete tutorial, straight from David.
It’s 98 degrees here in Los Angeles but my mind is on fall.
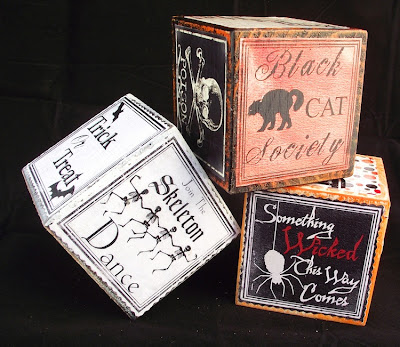
These rustic blocks are a variation on the Halloween Tea Light Holders I sell in my Etsy store. This version is easy to make, inexpensive and, I think, very versatile.
You will need:

Cut your 4x4 post down in to 3 ½ inch blocks – they can do this for you at most hardware stores or you can do it by hand. I gave the blocks a light sanding – just to avoid splinters – but I didn’t want them too smooth as I want to make use of the rough texture. After that it was just a quick coat of my base colors on the sides, top and bottom. One coat is all that’s needed and having uneven amounts of paint is the goal so I painted heavily in some spots and very lightly in others and set them aside to dry.

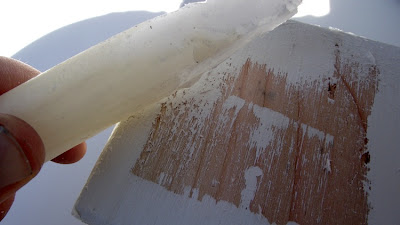
After the paint dried I simply rubbed the blocks with my candle hitting spots on the sides, edges and top wherever I wanted my base coat color to show through.
Then it was time for my contrasting color top coat. So I top-coated my white block with orange paint, my black block with white paint and my orange block with black paint and allowed them to dry.

While they were drying I gathered my paper. As I mentioned, the Graphics Fairy is a great source for Halloween images. You can use clip art, scrapbook paper, scrap book embellishments, old photos – pretty much anything you can come up with. I cut all my paper down into 3 ¼ x 3 ¼ inch squares and then rounded the corners or cut them with pinking shears.

By now the paint had dried and it was time to sand away the wax revealing the base color underneath and all the nooks and crannys in the wood.

At this point I’m always tempted to just leave them as they are but I never can resist adding the images. So I just Mod Podged my squares to the sides and top of the blocks – I didn’t even have to worry much about wrinkles or bumps as they only add to the texture. I quick top-coat of Mod Podge and then, when dry, a polycrylic spray sealer and that’s all there is to it.


 |
Hello Podgers! It's time for Halloween - and in a big way. I'm ashamed that it's almost the end of September and I have barely started Halloween crafting. I gotta get on the stick this weekend. Black glitter isn't going to sprinkle itself!
Luckily Man Podger David has begun Halloween crafting, so he is totally saving my butt this week. These Mod Podged blocks will make a great addition to your home decor, especially to those decorative mantles that so many of you do. Here is the complete tutorial, straight from David.
It’s 98 degrees here in Los Angeles but my mind is on fall.
These rustic blocks are a variation on the Halloween Tea Light Holders I sell in my Etsy store. This version is easy to make, inexpensive and, I think, very versatile.
You will need:

- 4 x 4 wood post cut down into 3.5" blocks (due to the funkiness of lumber measurements, a 4 x 4 post is actually a 3.5 x 3.5 post so to cut it into blocks you just need to slice off 3.5" segments)
- Paint (I used spray paint but any craft paint will work just great)
- 100 grit sandpaper (a orbital sander is a time saver but you can totally do this with elbow grease)
- A candle
- Mod Podge and foam brush
- Paper – you can use old scrap paper or, if you’re like me, design your own using MS Word, clip art and images from The Graphics Fairy
- Edge cutters (pinking sheers, a corner round) – optional
Cut your 4x4 post down in to 3 ½ inch blocks – they can do this for you at most hardware stores or you can do it by hand. I gave the blocks a light sanding – just to avoid splinters – but I didn’t want them too smooth as I want to make use of the rough texture. After that it was just a quick coat of my base colors on the sides, top and bottom. One coat is all that’s needed and having uneven amounts of paint is the goal so I painted heavily in some spots and very lightly in others and set them aside to dry.

After the paint dried I simply rubbed the blocks with my candle hitting spots on the sides, edges and top wherever I wanted my base coat color to show through.

Then it was time for my contrasting color top coat. So I top-coated my white block with orange paint, my black block with white paint and my orange block with black paint and allowed them to dry.

While they were drying I gathered my paper. As I mentioned, the Graphics Fairy is a great source for Halloween images. You can use clip art, scrapbook paper, scrap book embellishments, old photos – pretty much anything you can come up with. I cut all my paper down into 3 ¼ x 3 ¼ inch squares and then rounded the corners or cut them with pinking shears.

By now the paint had dried and it was time to sand away the wax revealing the base color underneath and all the nooks and crannys in the wood.

At this point I’m always tempted to just leave them as they are but I never can resist adding the images. So I just Mod Podged my squares to the sides and top of the blocks – I didn’t even have to worry much about wrinkles or bumps as they only add to the texture. I quick top-coat of Mod Podge and then, when dry, a polycrylic spray sealer and that’s all there is to it.

Comments
Post a Comment