Red Heart Paper Quilling
Let's just say there have been way too many snow days lately. This week has just been crazy and I feel like I haven't even got anything done! The other day we were stuck in the house while it was dark and rainy, so I decided to try paper quilling. I wanted to make a heart. I took some pics along the way of my first quilling project, I didn't really know what I was doing but I still had fun and liked how it turned out. Pardon the lighting, I had no natural light so I strapped on the external flash and went to town.

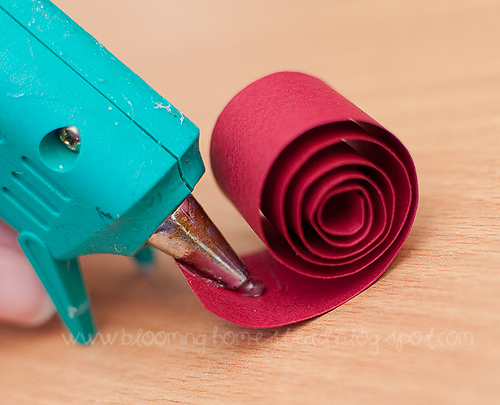
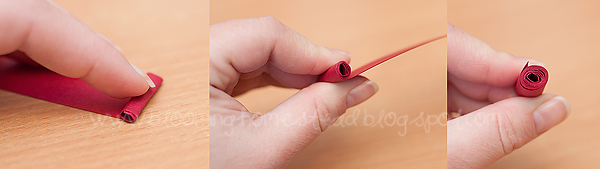
First I used cardstock in a deep red color I liked. Cardstock is a little tricky because of its stiffness but it is the only red I had on hand (besides kids construction paper) I cut them into 1 inch wide strips roughly because I wanted some good dimension for my final project.

I started at one end slowly rolling the paper tightly until it was all rolled.

They ended up looking like this. When I let go of them they loosen and each take on their own little personality.
I thought these could be so cute on a valentine card, hanging up, as a garland, or even just sitting out. I really loved how the look turned out. Okay, moving on. :)
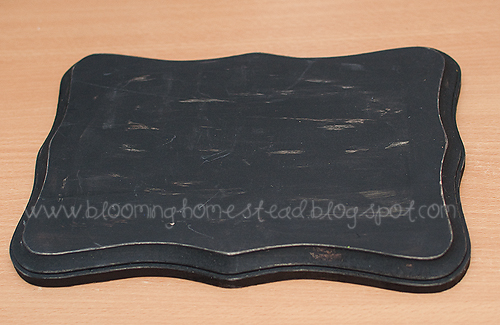
I went to the basement to find something to put my heart on. I am working on crafting with what I have and re-purposing items already in my stash. I found this little wood plaque that I had previously painted black to use for a different project that never happened. I just got some flat white paint and painted over the black. I should have used primer, but I didn't, so after like 3 coats we were good to go.
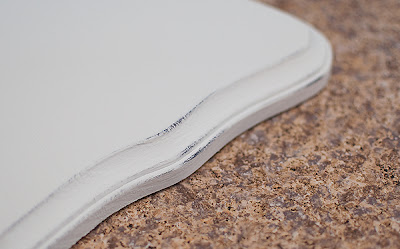
I did a light sanding on the edges just to add some personality, and you can see that some of the black started showing through which looked good.Then I just lightly put a few dabs of hot glue on the back side of the heart and stuck it on. Didn't get a picture of that step but I'm sure you get the picture!

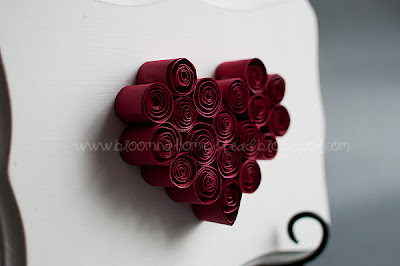
Final product. Note to self: be more careful with the hot glue next time! If I had my sillouette (I'm still dreaming of one...think of all the cool stuff I could make!) I would have possibly added a little vinyl to spice it up a bit.


They ended up looking like this. When I let go of them they loosen and each take on their own little personality.

I decided to use a little hot glue and dabbed a little on the end to keep the rolled paper bound.
I set up all my rolled circles together and put them in a heart shape. I kept rearranging them until I got them how I liked them. Notice the very bottom one is different, I squeezed the very bottom of the circle to elongate it. After I had them how I liked them I started using a little hot glue to glue them to each other. One thing to note: Using a craft glue of e6000 would probably be less obvious, I wasn't as careful as I should of been so if you look close you can see evidence of the hot glue.

I set up all my rolled circles together and put them in a heart shape. I kept rearranging them until I got them how I liked them. Notice the very bottom one is different, I squeezed the very bottom of the circle to elongate it. After I had them how I liked them I started using a little hot glue to glue them to each other. One thing to note: Using a craft glue of e6000 would probably be less obvious, I wasn't as careful as I should of been so if you look close you can see evidence of the hot glue.

I thought these could be so cute on a valentine card, hanging up, as a garland, or even just sitting out. I really loved how the look turned out. Okay, moving on. :)

I went to the basement to find something to put my heart on. I am working on crafting with what I have and re-purposing items already in my stash. I found this little wood plaque that I had previously painted black to use for a different project that never happened. I just got some flat white paint and painted over the black. I should have used primer, but I didn't, so after like 3 coats we were good to go.

I did a light sanding on the edges just to add some personality, and you can see that some of the black started showing through which looked good.Then I just lightly put a few dabs of hot glue on the back side of the heart and stuck it on. Didn't get a picture of that step but I'm sure you get the picture!

Final product. Note to self: be more careful with the hot glue next time! If I had my sillouette (I'm still dreaming of one...think of all the cool stuff I could make!) I would have possibly added a little vinyl to spice it up a bit.

I'm so Lovin' this...it doesn't hurt that it was free since I had everything I needed to make it work.
Comments
Post a Comment